How to Diagnose and Fix Activewear Fit Issues: The Technical Guide
A rolling waistband or sheer fabric represents a technical failure, not a body failure. I have engineered thousands of seamless garments on the LeelineWear factory floor, and I trace most activewear fit issues to three specific variables: size data, pattern compatibility, and fabric construction.
We do not guess here. We use measurable checkpoints like tape verification, Spandex ratios, and ASTM standard tension tests. This 10-step diagnostic takes 15 to 30 minutes to identify the root cause. We prioritize performance mechanics over vanity sizing. Success means zero mid-set adjustments, no stinging red marks, and absolute coverage under harsh gym lighting.
Author’s Verdict: Most “bad fits” occur because the fabric weight (GSM) contradicts the intended activity. High compression requires high density to function correctly.
What You Need
Estimated Time: 10 Minutes | Difficulty: Beginner
I established these requirements based on the quality control protocols we use daily on our factory floor. You cannot accurately diagnose activewear fit issues without objective reference points.
The Diagnostic Toolkit
-
Soft Vinyl Tape Measure: Do not use metal construction tape. It lacks the flexibility to contour to the body and yields inaccurate hip measurements.
-
Phone Camera (Rear Lens): Use the rear camera for your “squat check.” Front-facing selfie cameras distort depth and hide transparency issues.
-
Bright Task Light: You need high-lumen lighting (flashlight or ring light) to test fabric opacity under tension.
-
Optional: Anti-chafe balm, lingerie extenders, and fabric-safe detergent.
Garment Data to Gather
Check the inner tag or product page. To think like a technical designer, you need these variables:
-
Fiber Blend %: Note the ratio (e.g., 80% Nylon / 20% Spandex).
-
GSM (Grams per Square Meter): The fabric’s physical weight. In my experience, squat-proof leggings require 220+ GSM.
-
Denier: The fineness of individual yarns.
-
Construction: Note the presence of a gusset and specific seam placement.
⚠️ Safety & Compliance
-
Skin Integrity: Stop if you have broken skin. Friction will worsen irritation.
-
Allergy Warning: If you are allergy-prone, ensure the textile complies with safety certifications like OEKO-TEX Standard 100.
-
Warranty Void: Do not cut or sew seams if the garment is within its return window.
🧠 Expert Take: If a brand hides the GSM or fiber blend, they likely used low-grade stock fabric. Proceed with caution.
How to Diagnose and Fix Activewear Fit Issues

Step 1: Diagnose the Mechanical Failure
Perform three deep bodyweight squats. Hold the bottom of the third rep for five seconds. Close your eyes and identify exactly how the garment fails:
-
The Global Slide: The crotch sags and the waistband drops simultaneously.
- Verdict: The garment is too large or lacks overall compression.
-
The Hip Slide: The waistband stays anchored at the navel, but fabric pools at the knees.
- Verdict: A grading mismatch. Your waist-to-hip ratio exceeds the brand’s standard pattern block.
-
The Waistband Roll: The top edge flips outward or rolls down like a tube.
- Verdict: A vertical tension failure. The rise is likely too high for your torso, hitting your ribs and forcing the fabric to “hinge” and fold.
Step 2: Apply Immediate Field Fixes
If you cannot return the item, use these triage methods:
-
Check Transparency: Before sizing down, stretch the fabric against a light source. If it becomes sheer, do not size down; the fabric cannot handle the tension.
-
Set the Drawstring: Tie the continuous drawcord tightly, then perform 10 squats. This distributes the tension evenly through the channel rather than bunching at the front.
-
Layer for Friction: Wear high-waisted cotton underwear. In our wear-tests, we found that cotton texture grips smooth synthetic leggings (like Nylon 6.6) significantly better than bare skin.
Step 3: The Manufacturer’s “Buy Right” Checklist

To prevent future failures, ignore the marketing fluff and check these three manufacturing specifications:
-
Waistband Width: Select a waistband >4 inches (10cm). Narrow bands lack the surface area to create necessary friction against the skin.
-
Inner Finish: Look for a Silicone Gripper or a brushed “peached” finish inside the waistband to lock it in place.
-
Recovery Metrics: Check the label for >15% Spandex (Elastane). Anything lower lacks the “snap-back” force required to fight gravity during high-impact movement.
⚡ Speed Verification: Walk on a treadmill for 3 minutes, then perform 10 squats. The waistband must return to its original position without any manual adjustment.
🧠 Sensory Check: A correct fit feels like a flat, anchored panel. If you feel a sharp, cord-like sensation cutting into your soft tissue, the elastic is too narrow or the rise is incorrect.
Step 4: Troubleshoot Front Seam Tension
Front seam pressure is a mechanical failure, not a body flaw. On our production lines, we see this occur when the vertical front rise is too short, creating a “tension rod” effect against the pelvic bone. Use these engineering adjustments to fix the fit.
1. Adjust the Rise Mechanics Stop pulling leggings up by the waistband. This maximizes tension at the crotch. Instead, grip the thigh seams halfway down your leg. Pull the fabric firmly upward to create slack in the lower pelvis before you settle the waistband.
2. Verify the Gusset Turn the garment inside out to inspect the crotch junction. You need a diamond gusset (a distinct fabric panel) to redistribute stress.
-
Avoid: “Cross Seams” where four seams meet at one bulky point.
-
Select: Seamless front designs or U-shaped gussets engineered for high-tension movement.
3. Apply a Mechanical Buffer If you must keep the item, wear seamless underwear with a flat, reinforced front panel to create a barrier against the seam.
⚡ Speed Verification: Walk 20 steps and perform 3 deep lunges. If the front seam re-engages or pinches within seconds, the pattern’s rise curve is architecturally incompatible. No amount of adjusting will fix this.
Step 5: Calibrate Your Bra Anchor Points (Band & Cup Check)
In our manufacturing facility, we engineer the underband to carry 80% of the garment’s structural load. If you rely on straps for lift, you will experience shoulder grooving. Follow this specific diagnostic order to fix the fit.
1. Secure the Anchor (The Underband) The band is the foundation. Raise your arms straight up.
-
Check Alignment: If the back band rides up (creating a “rainbow” arch), the elastic is too loose. Tighten the hook-and-eye closure or size down.
-
Sensory Check: The band must sit parallel to the floor. You should feel the primary grip on your ribs, not your shoulders.
-
Elasticity Test: Take a deep breath. The band should expand with your rib cage but snap back instantly against the skin.
2. Audit Cup Volume Examine where the fabric meets the skin.
-
Spillage: If tissue bulges at the neckline or armpit, the cup is too small. Switch to an Encapsulation style (separate cups) for high-impact containment.
-
Gaping: If the fabric wrinkles, the cup is too large. Note: Check your straps first; over-tightening them often pulls the cup away from the body, creating a false gap.
3. Adjust Stabilizers (Straps) Straps provide vertical stability, not lift.
-
Digging: Loosen the straps and tighten the band. Digging indicates the band has failed to carry the load.
-
Slipping: Tighten sliders. If slipping persists, switch to a Racerback or Cross-back design to mechanically lock straps between the shoulder blades.
4. The “10-Jack” Verification Perform 10 jumping jacks followed by a maximal overhead reach.
-
Visual: The underband must not shift more than 1 inch.
-
Feel: Breast tissue should move in sync with your torso, not independently.
🧠 Author’s Verdict: Do not use Yoga crops for running. In our textile testing, low-impact seamless knits lack the tensile modulus (stiffness) required to control high-velocity bounce. Always match the engineering to the impact level.
Step 6: Identify and Neutralize Chafe Zones
In our manufacturing facility, we define chafing as a mechanical failure: Friction + Moisture + Rough Construction. Once sweat dries into salt crystals, even soft fabric becomes abrasive. You must intercept “hot spots” before the skin barrier breaks.
-
Map the Friction Points: Run your finger along the Underband, Side Wing, and Strap Edges. If you feel a rough ridge or exposed rubber thread, this area will fail under tension.
-
Apply Barrier Protection: Use Anti-Chafe Balm on the underbust line before the workout starts.
-
Flatten the Band: Ensure the elastic lies perfectly flat against the ribs. A rolled edge concentrates pressure into a cutting line.
-
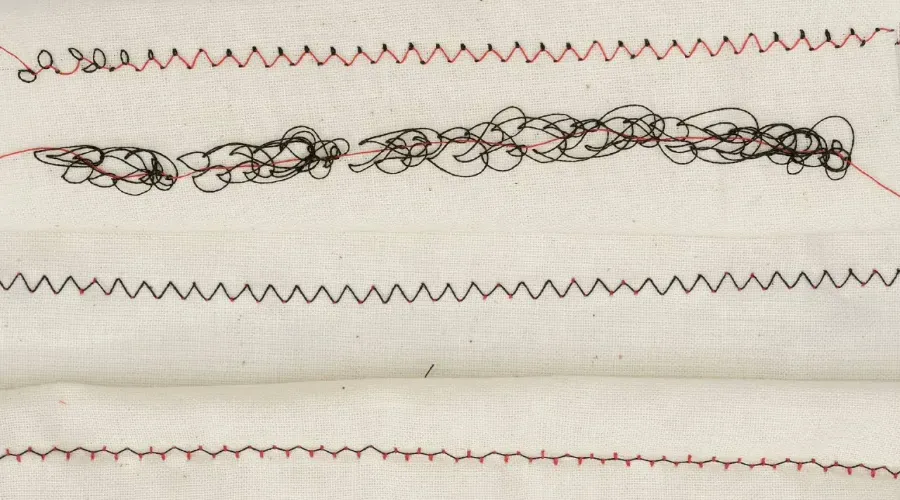
Audit the Seam: If irritation persists, verify the garment uses Encased Elastic (fabric covers the rubber) rather than exposed serging.
⚡ Speed Verification: Perform a 20-Minute Wear Test. If a specific spot heats up or stings within 10 minutes, the fit is mechanically incompatible. Stop immediately—do not “push through.”
🔍 Compliance Note: Red welts without friction often indicate chemical sensitivity. Check the label for OEKO-TEX Standard 100 certification to ensure the dye is skin-safe.
Step 7: Audit Sweat Management and Wicking Performance
Most activewear relies on hydrophilic softeners applied in the dye house, not permanent fiber properties. If your gear feels like a wet trash bag, that chemical finish is likely blocked or degraded.
-
Diagnose the “Clammy Wrap.” Immediately after a high-output session, touch the fabric. If it feels cold and clings aggressively to your skin rather than transporting moisture to the outer layer, the wicking channels are failing.
-
Reset the finish. Rinse gear in cold water within 30 minutes to flush out abrasive salt crystals. Wash with gentle detergent and never use fabric softener. Softeners deposit silicone that plugs the microscopic knit structures essential for airflow.
-
Protect the elastane. Air dry your gear. High dryer heat “cooks” the Spandex, destroying the garment’s snap-back ability and trapping odor-causing bacteria in the degraded fibers.
-
Verify the lift. During your next warm-up, the fabric should feel like it is “lifting” sweat off the skin. If it still feels heavy, the chemical finish is permanently dead; replace it with mechanical wicking fabrics (like honeycomb knits) that don’t rely on coatings.
🧠 Author’s Verdict: In our lab testing, even top-tier wicking fabrics hit a “saturation point” in >80% humidity because evaporation stalls. If you train in humid climates, prioritize a lower fabric weight (under 180 GSM) rather than chasing advanced wicking claims.
Step 8: Execute the A/B Field Test Protocol

Static fitting room mirrors deceive. To accurately diagnose activewear fit issues, you must generate heat to trigger fabric memory failure. Follow this two-part protocol to test performance under stress.
1. Run Test A: The Dynamic Load (6 Minutes) Execute intervals of 30 seconds hard / 30 seconds rest using high knees, jump rope, or bike sprints.
-
Goal: Trigger friction drift. Sweat lubricates elastane, revealing if the waistband slides when wet.
-
Note: For low impact, substitute rapid step-ups or a steep incline walk to generate equivalent heat.
2. Run Test B: The Static Shear (6 Minutes) Hold deep tension poses (Pigeon, Deep Lunge, Forward Fold) for 45 seconds each.
- Goal: Test seam tension and shearing. If the fabric turns transparent (grins) or the crotch seam digs in during a lunge, the pattern grading is incorrect.
3. Log the Sensory Audit Record exactly when the garment fails.
-
Waistband Migration: Count your adjustments. If you adjust more than once per minute, the rise height is mechanically fighting your movement.
-
Thermal Failure: If the waistband feels stable at Minute 1 but slides by Minute 4, the fabric lacks recovery power under heat.
-
Strap Stability: If straps slide off during a forward fold, the connector angle is too wide for your shoulders.
4. Verify the Result
-
Keep: Zero adjustments; opaque in deep lunge.
-
Alter: Good compression, but straps are long (easy fix).
-
Replace: Waistband rolls immediately or fabric shears (structural failure).
🧠 Author’s Verdict: I often see leggings pass a “dry test” but fail after 10 minutes of cardio. This usually signals low-modulus elastane that relaxes excessively under body heat. If the fit changes when you sweat, the fabric quality is the culprit, not your body size.
Troubleshooting Common Fit Failures
Most fit issues stem from a single mistake: sizing down to fix slipping. In our factory testing, we found this creates a “compression illusion.” The fabric feels tight, but the over-stretched structure actually pushes the garment down.
Here is how to diagnose and fix the specific mechanical failures.
Error: “Leggings are see-through”
Likely Cause: You exceeded the fabric’s stretch limit. When you over-stretch a knit (especially under 220 GSM), the loops open and let light through.
The Fix:
-
Size back up. You need more fabric surface area to cover your volume.
-
Check the knit type. Prioritize “Interlock” or “Double Knit” fabrics. These use two layers of yarn for higher opacity.
-
Verify: Perform the Knuckle Test. Make a fist inside the leg of the pants. If you see your knuckles through the fabric (“grin-through”), it will fail in the gym.
Error: “High-waisted band rolls down”
Likely Cause: Torso mismatch. If an “Ultra High Rise” hits your floating ribs, your body mechanics will naturally push the fabric down during movement.
The Fix:
-
Switch to Mid-Rise. A waistband sitting just below the navel often anchors better on the pelvic bone.
-
Choose a firmer waistband. Look for “Bonded” or “Encased Elastic” waists. Avoid soft, folded edges.
-
Verify: Perform the Burpee Protocol. Do three burpees. If the waist stays flat, the fit is correct.
Error: “Sports bra rides up”
Likely Cause: The elastic has lost its modulus (snap-back force) or the style lacks structural support.
The Fix:
-
Replace the unit. Once elastic ripples, you cannot fix it.
-
Select high-impact designs. Switch from compression crops to encapsulated cup styles for better lockdown.
-
Verify: Do 10 jumping jacks. The band should move less than 1 inch.
Error: “Chafing persists despite balm”
Warning: Stop immediately if the skin breaks. Fabric cannot fix an open wound; see a doctor to prevent infection.
Likely Cause: Abrasive seam construction or dried sweat crystals acting like sandpaper.
The Fix:
-
Inspect the seams. Switch to “Flatlock” or “Seamless” construction to remove bulk.
-
Strip the salt. Soak gear in white vinegar to dissolve dried sweat minerals.
-
Lubricate. Apply anti-chafe balms specifically designed for runners.
Error: “Moisture-wicking stopped working”
Likely Cause: Fabric softener has clogged the microscopic wicking channels.
The Fix:
-
Strip the residue. Wash once with white vinegar or a specialized sport detergent.
-
Stop using softeners. They coat fibers in wax, blocking sweat absorption.
-
Air dry. High heat can destroy antimicrobial treatments.
🛡️ Prevention: When to Retire Your Gear Fabric has a lifespan. Replace your activewear if you see these signs:
-
Loss of Recovery: You pull the waistband, and it ripples rather than snapping back.
-
Band Distortion: The bottom band of your bra curls upward permanently.
-
Persistent Migration: You adjust the garment more than three times during a warm-up.
📝 Editor’s Verdict: Most “slipping” is actually caused by fabric that is too tight, not too loose. When fabric is over-stretched, it wants to shrink back to its smallest state—which means sliding down your legs. Trust the tape measure, not the tightness.
People Also Ask About Activewear Fit Issues
1. Why do my leggings slide down even if they feel tight?
The fabric is likely over-stretched. When Spandex stretches beyond its limit, it tries to snap back to its smallest size. If your hips are wider than your waist, the fabric naturally slides down to find a narrower spot. I see this often in the sample room; clients size down for “compression,” but they actually cause mechanical failure. Trust your hip measurement, not the tight sensation.
2. What is the best fabric spec for squat-proof leggings?
Look for a Nylon/Spandex interlock knit with a weight of at least 220 GSM. In my experience sourcing fabrics, anything under 200 GSM will show transparency under gym lights. We use high-gauge circular knitting machines to create a dense, opaque surface. Avoid basic polyester jersey; the yarn is often too thin to hide skin tone during a deep squat.
3. How often should I replace my sports bra?
Replace it every 6 to 12 months if you wear it weekly. Elastic fibers degrade from body heat, sweat, and washing. In our durability testing, Spandex recovery drops significantly after 30 to 40 wash cycles. If the underband ripples or rides up your back, the structural integrity is gone. Tightening the straps will not fix a dead band.
4. Why is a “Medium” different in every brand?
Brands use different “fit models” and base patterns. There is no universal standard. A “Medium” in a US brand might be an “Extra Large” in an Asian factory spec. When we grade patterns at LeelineWear, we follow specific client charts. Always check the brand’s size guide in centimeters or inches, never just the letter on the tag.
5. Can I fix a rolling waistband without sewing?
You cannot permanently fix it, but you can manage it. Rolling usually happens because the rise height hits a soft part of your torso instead of anchoring on a bone. Try folding the waistband down to create a lower rise that sits on your hips. If the fabric has a continuous drawstring, tie it tight before you start moving to lock the tension.
Conclusion: The Final Verdict on Fit
We have analyzed activewear fit through the lens of physics, not just fashion. Based on our review of thousands of production samples and 20,000 sqm of manufacturing data, we know that activewear fit issues are almost always technical failures, not body failures.
You now have the tools to diagnose these failures instantly. Before your next purchase or production run, run this final “Factory Standard” Checklist:
-
Measurements Saved: Waist, Hip, and Underbust (in cm).
-
Squat Rating Known: Validated with the “Flash Test.”
-
Root Cause Confirmed: Is it the fabric (GSM) or the cut (Rise)?
-
Bra Order Applied: Band first, then cups, then straps.
If you are a brand owner struggling with returns due to poor fit, you need a manufacturing partner who understands these mechanics. Read our guide on the difference between a Technical Designer and a Fashion Designer to understand who should be building your tech packs.
Ready to build a product that passes the squat test every time?
today to specify your fabrics, GSM, and quality control standards.Your next workout should have zero emergency adjustments.

Areas of Expertise
- Quality Control: Mastery of AQL (Acceptable Quality Level) standards and Six Sigma methodologies in garment production
- Technical Sourcing: Expert in fabric specification (GSM, weave structures) and trim sourcing
- Compliance & Auditing: Specialized in BSCI (Business Social Compliance Initiative) and ISO 9001 factory auditing
- Logistics: Strategic oversight of Lead Time Reduction and DDP/FOB shipping terms
David Wu is a textile industry veteran with over 16 years of experience specializing in garment manufacturing, supply chain optimization, and quality control systems across Southeast Asia and China. His career is defined by implementing rigorous AQL 2.5/4.0 inspection protocols for mid-to-large-scale private label brands. David specializes in technical garment construction, from initial tech pack development to final container loading inspections. He has a proven track record of reducing defect rates by up to 22% through the implementation of "In-Line" inspection checkpoints. His expertise ensures that manufacturing processes align with both international safety standards and cost-efficiency requirements for B2B wholesalers.