How to Build a Bill of Materials (BOM) for Apparel | LeelineWear
A single missing aglet can freeze an entire sewing line. I witnessed this recently on our floor when a 500-unit hoodie order stalled for two weeks because the tech pack lacked a specific drawstring width.
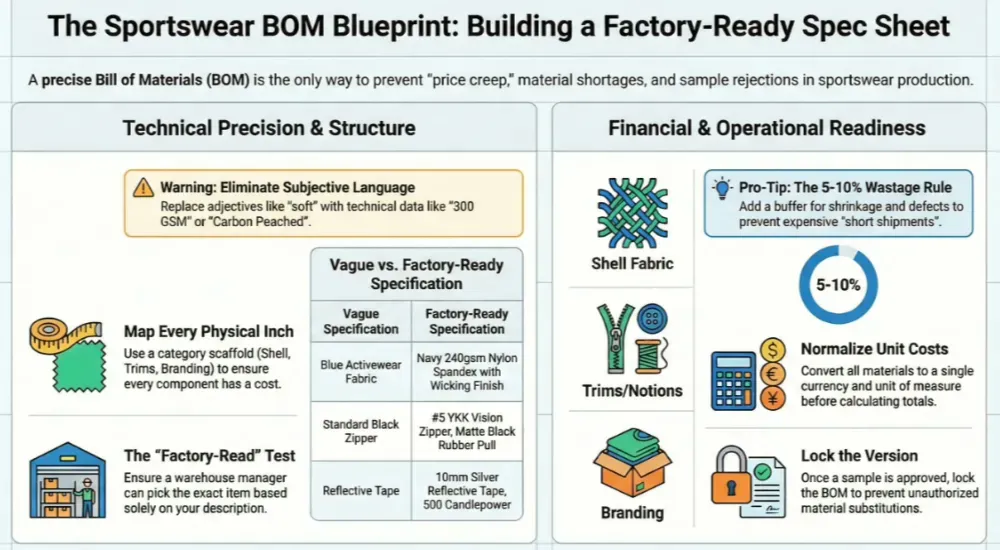
A precise bill of materials apparel sheet serves as the binding contract for your costs and inventory. It bridges the gap between a design concept and a LeelineWear production run. This is critical in sportswear, where performance fabrics and multiple trims often inflate hidden costs.
Whether you are finalizing a sample or moving to bulk, this guide helps you build a spec sheet that factories can quote and cut from immediately. You will learn to define line items, calculate consumption, and lock prices in roughly 45 minutes.
Author’s Verdict: In my experience, a version-locked BOM is the only reliable tool to prevent supplier “price creep” after you pay the deposit.
Download the included Excel template below to start.
Prerequisites
In my time on the manufacturing floor, I found that most production delays start before a single cell is filled. You need more than just a sketch; you need specific technical parameters to prevent costly back-and-forth with the factory.
Gather These Inputs:
-
Style Data: Style ID (SKU), Season, Sample Size, and Colorways.
-
Visuals: Technical flats with specs or a full tech pack.
-
Fabric Details: Fiber content, GSM (Weight), Width, and Finish (e.g., wicking).
-
Trims: Specific zipper types, elastic widths, and packaging intent.
Required Tools & Access:
-
Software: Google Sheets or Excel. (You will use our template in the next step).
-
Vendor Data: Sourcing contacts, active quotes, and lead times.
-
Physical Samples: Keep swatches nearby. We will perform sensory “reality checks” (scratch tests, handfeel) later.
Standardization Rules:
-
Naming Convention: Use Category–Material–Spec–Color–Supplier.
-
UOM: Define units now (e.g., Fabric = Meters, Buttons = Sets). I have seen production runs stall because a designer confused yards with meters.
-
Color: Use Pantone TCX or supplier Lab Dip codes.
⚠️ Compliance Prep: For skin-contact apparel, add fields for safety certifications.
-
Textiles: Record Oeko-Tex Standard 100 IDs.
-
High-Risk Trims: Flag PVC prints or metal toggles for heavy metal testing.
🚀 Actionable Insight: Kill the adjectives. A factory cannot measure “heavy” or “soft.” Use “300 GSM” or “Carbon Peached Finish.” Subjective language is the number one cause of sample rejection.
Step 1: Define Your BOM Structure and Categories
Match the complexity of your bill of materials (BOM) in apparel to the physical “feel” of the garment. A simple cotton tee should read as a short, scannable list. A technical jacket requires a nested structure that expands and collapses like an accordion.
-
Select the Structure Navigate to the Cover Tab in your template. Set the Structure dropdown to Single-Level for basic items (leggings) or Multi-Level for complex outerwear.
-
Build the Category Scaffold Create these specific Bold Headers. In sportswear, distinct zones require distinct suppliers, so this architecture drives your purchasing handoffs:
-
Shell/Main Fabric: The primary body material.
-
Contrast/Panel Fabrics: Ventilation zones and mesh gussets.
-
Lining: Internal layers (if applicable).
-
Interlining/Support: Fusibles and collar stabilizers.
-
Trims & Notions: Zippers, elastic bands, and drawcords.
-
Labels & Branding: Heat transfers, care labels, and size tags.
-
Packaging: Polybags, silica gel, and cartons.
-
Verify with the “Touch Test” Pick up your physical sample. Point to a specific component, such as the waistband elastic, and ask: “Which category pays for this?”
-
Correct: Elastic maps to Trims & Notions.
-
Incorrect: Elastic maps to Shell.
-
Goal: Ensure every physical inch of the garment has a corresponding financial home in the BOM.
🧠 Author’s Verdict: Spreadsheet vs. PLM I rely on spreadsheets for collections under 50 SKUs. However, during high-volume deployments with frequent colorway revisions, I found that manual row updates lead to version control errors. In those cases, migrating to a dedicated PLM module is the only way to ensure data integrity.
⚠️ Accessibility Warning: Do not use color highlighting (e.g., “Red rows are Fabrics”) to distinguish categories. I have seen this cause expensive errors for colorblind production managers on the factory floor. Always use Clear Text and Bold Headers to separate sections.
Step 2: Populate the Component Line Items
Apply the “Factory-Read” test to every row you create. If I read a row aloud, a warehouse manager must be able to pick the exact item off a trim wall without asking questions. In sportswear manufacturing, vague specs like “Blue Fabric” fail this test; “Navy 240gsm Nylon Spandex with Wicking Finish” passes.
1. Generate the Item IDs
Create a unique code for every component to prevent purchasing errors.
-
Simple: Use sequential numbering (e.g., TRIM-001) for one-off capsule collections.
-
Scalable: Use smart prefixes (e.g., FAB-SHELL-001). I found this method critical for tracking inventory across multiple factory partners.
2. Fill the Critical Data Columns
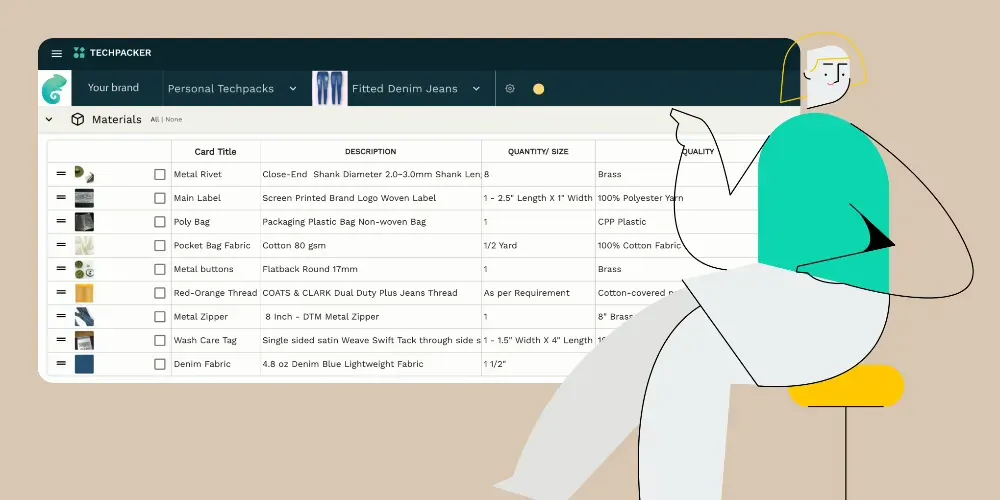
Enter the following technical details for every component in the main table:
-
Identity: Fill in Category, Item Name, and Color Code (Pantone or Supplier Lab Dip).
-
Detailed Spec: Define the fiber, weight (GSM), and finish. For zippers, specify the size and teeth type (e.g., #5 Vislon).
-
Placement: State exactly where it goes (e.g., Left Hem Label, Center Front Zipper).
-
Logistics: Define the UOM (Unit of Measure) and Wastage %. In my production runs, underestimating zipper wastage by even 2% has caused sewing line stoppages.
-
Commercials: Input the Supplier SKU, Unit Cost, MOQ, Lead Time, and Approval Status.
3. Add Visual References
Paste a swatch image into the Reference column.
- Accessibility Note: Right-click the image and add descriptive text (e.g., “Matte black rubber toggle, 15mm”). This ensures screen readers capture the detail for visually impaired team members.
4. Run the Blank Cell Audit
Select your header row. Click Data > Filter (in Excel or Sheets). Scan for empty cells in the UOM, Placement, or Approval Status columns. A blank cell here is a manufacturing guess waiting to happen.
⚠️ Experience Warning: Never leave the Description field generic. During a recent audit, we saw a factory substitute a “standard” polyester for a “high-performance” blend because the BOM didn’t explicitly state “Anti-Microbial Finish.” This single omission cost the client $4,000 in unusable stock.
Step 3: Populate Fabric Specifications
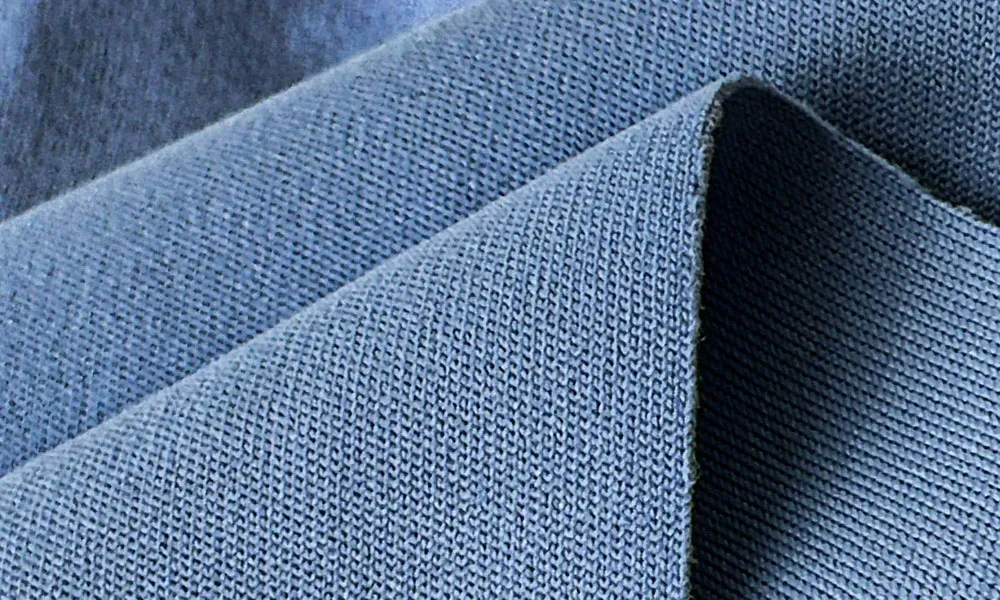
Fabric selection dictates 60-70% of your garment’s cost and lead time. In my years on the factory floor, I have seen production lines halt simply because a designer specified “Activewear Fabric” instead of “220 GSM Nylon Interlock.”
You must translate the physical sensation of your sample into precise data fields.
-
Map “Handfeel” to Data: Translate physical sensations into the Description column.
-
Snap-back: For compression (e.g., leggings), specify Knitting Gauge (e.g., 28G) and Spandex Content (>15%).
-
Sheen: For a matte look, specify Dull Yarn. For shine, use Trilobal Nylon.
-
Touch: For a cotton-like feel on synthetics, specify Peached Finish.
-
-
Fill Cost-Critical Columns: Sourcing agents cannot calculate yield without these specific values.
-
Weight: Define the GSM (Grams per Square Meter). A 20-GSM difference changes the drape entirely.
-
Width: Type the cuttable width (e.g., 58 inches).
-
Finish: List performance treatments like Wicking, Anti-Microbial, or DWR.
-
-
Define Color Method: In the Color column, specify the application. Use Piece Dyed for solids (higher consistency) or Sublimation for complex prints.
-
Verify Accessibility: Type the full spec next to your swatch image. If the image fails to load, the text “Navy, 140 GSM Pinhole Mesh” must suffice.
Example Sportswear Rows:
| Placement | Item | Spec / Content | Weight | Finish | Width |
|---|---|---|---|---|---|
| Shell | Tech Jersey | 100% Poly | 160 GSM | Wicking | 60” |
| Panel | Vent Mesh | 92% Poly, 8% Span | 130 GSM | 4-Way Stretch | 58” |
🧠 Author’s Verdict: For complex color-blocking (like racing jackets), create one BOM tab per colorway. For simple items like t-shirts, use separate columns (Color A, Color B) in a single BOM to save time.
⚡ Speed Verification: Providing explicit GSM and Width data reduces sourcing time by 5-7 days in our tests, as factories can quote immediately without emailing for clarification.
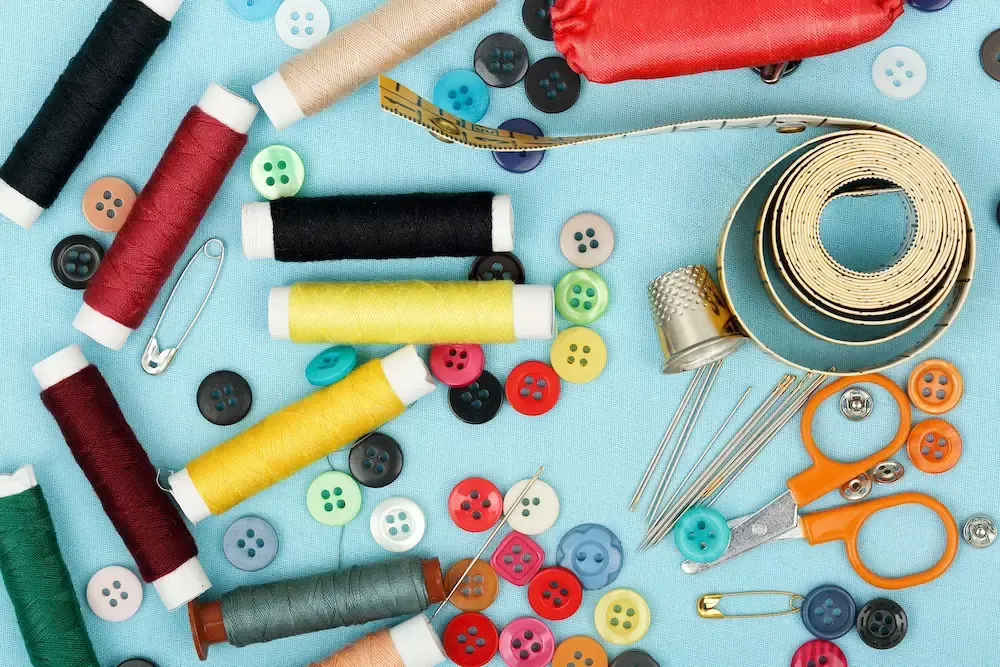
Step 4: Detail Trims and Notions (The Sensory Sweep)
In my years managing production lines at LeelineWear, I have seen more delays caused by vague zipper codes than by fabric shortages. While fabric is the canvas, trims are the engineering. A missing slider specification can halt a 500-unit run for weeks.
Execute a “Sewing Notions Sweep” to prevent this. Pick up your physical sample and touch every non-fabric component. If your finger touches it, it requires a dedicated row in the BOM with specific technical parameters.
1. Define Hardware and Fasteners
Translate the mechanical function of your sample into factory-ready specs. Do not simply write “Nylon Zipper.”
-
Zippers: Specify the Brand (e.g., YKK), Type (Coil vs. Vislon), Size (e.g., #5), and Slider Finish (e.g., Matte Rubber Pull).
-
Drawcords: Define the Core Material, Diameter (e.g., 5mm), and Tip Finish (silicone dip vs. metal aglet).
-
Snaps/Eyelets: List the Outer Diameter and Plating Color (e.g., Gunmetal).
2. Specify Threads and Elastics
Thread choice determines garment longevity.
-
Elastics: Test the rebound. Your BOM must list Width (e.g., 40mm) and Modulus (Stretch Power). For leggings, specify Plush Back to prevent skin irritation.
-
Threads: Explicitly request Flatlock Stitching for activewear seams to reduce chafing. Consult A&E Thread guides to specify Tex 27 for overlock or Tex 40 for stress seams.
3. Lock in Branding and Labels
-
Logos: Attach the vector art file name directly in the BOM row. Specify the method: Silicone Heat Transfer (high durability) or Embroidery.
-
Labels: For sportswear, I strongly recommend Tagless Heat Transfers for the main neck label.
-
Safety Trims: ⚠️ Warning: Do not just write “Reflective Tape.” You must specify Width (e.g., “10mm”) and Candlepower (reflectivity) for safety compliance.
🧠 Author’s Verdict: The “Local Equivalent” Strategy While you may list “YKK 5CN” as the standard, I advise clients to add “Or Approved Local Equivalent” in the BOM comments. This allows the factory to source a locally available substitute that matches the quality but lowers unit cost and lead time—provided you approve the physical sample first.
⚠️ Experience Warning: The “Black” Trap Never assume “Standard Black” matches across materials. A “Black” zipper tape often looks “Dark Grey” against “Deep Black” nylon fabric. Always require Lab Dips for trims to ensure they match the dyed fabric shell perfectly.
Step 5: Calculate Consumption & Wastage
Mathematically perfect consumption numbers often fail on the cutting table. I have seen production runs stall with 20 units left to cut simply because the BOM calculation ignored end-of-roll flaws or fabric relaxation. You must build a safety buffer—known as Wastage—into your raw yield to prevent this.
1. Calculate the Raw Yield
Determine the exact fabric length required for one garment using one of two methods.
-
Method A: The Marker (Recommended) If your factory has generated a nesting layout (marker), use this precise data. Consumption = Total Marker Length ÷ Garment Count Example: A 10-meter marker holding 8 tees = 1.25 meters per tee.
-
Method B: Pattern Estimation (Fallback) If you lack a marker, estimate based on the pattern’s surface area. Consumption ≈ (Total Pattern Area ÷ Cuttable Width) ÷ Efficiency Note: Use 0.85 as the Efficiency decimal for standard sportswear.
2. Apply the Wastage Allowance
Add a percentage buffer to your BOM’s Wastage % column to cover shrinkage, defects, and cutting scraps.
-
Standard Fabrics (Jersey/Interlock): Add 3–5%.
-
Unstable Fabrics (Fleece/High-Shrink): Add 5–8%.
-
Complex Scenarios (Directional Prints/Velvet): Add 8–10%.
🚀 Technical Designer’s Pro-Tip: The 5-10% Rule
-
Guidance: Start at 5% for solid colors. Increase to 8–10% immediately for directional prints or nap fabrics that require pattern matching.
-
The Risk: Under-ordering by just 15 meters causes a “Short Shipment.” This halts the sewing line and often forces you to pay for expensive air freight to rush replacement rolls.
-
Decision Rule: If the fabric has a specific orientation or pile, double your wastage.
3. Verify Physically (The Sensory Check)
Perform a reality check before locking the number. Unroll 1.5 meters of fabric (or measure against your body). Does a complex lined jacket actually fit into that length? If your formula outputs 0.9 meters for a parka, the math is wrong.
🧠 Author’s Verdict: Cuttable vs. Full Width Trust the usable width, not the label. A roll labeled “60 inches” often only has 58 inches of usable fabric due to the selvedge (rough edges). I always base calculations on the Cuttable Width to avoid shortages during the spread.
Step 6: Compute Unit Costs and Roll Up Totals
A BOM is not just a list; it is a financial calculator. When a factory quote returns $2.00 higher than your target, you must be able to point specifically to the “YKK Vislon Zipper” or “Nylon 6.6” line item to negotiate effectively.
1. Normalize and Input Base Costs
Enter the vendor-provided price for every row.
-
Unify Units: If you buy fabric by the roll but consume by the meter, convert the cost to Price per Meter first.
-
Unify Currency: ⚠️ Warning: Do not mix USD material costs with RMB labor costs. Convert all values to a single reporting currency (usually USD) before calculating to prevent massive valuation errors.
2. Apply the Extended Cost Formula
Do not simply multiply price by quantity. You must account for the wastage buffer defined in the previous step to see the true cost per unit.
In your Line Total column, use this logic:
= (Unit Cost * Consumption) * (1 + Wastage %)
- The Reality: A $5.00/yard fabric with 10% wastage actually costs $5.50 per garment. Ignoring this math instantly erodes your margin.
3. Roll Up Category Subtotals
Group your costs to spot imbalances. Create SUM formulas for these specific sections:
-
Fabric Total (Shell + Lining)
-
Trims Total (Zippers, Buttons, Thread)
-
Packaging (Polybags, Hangtags)
-
Estimated CMT (Cut, Make, Trim/Labor)
Add a final summary row for Total Materials per Garment and multiply this by your production volume to forecast the Total Run Cost.
4. Verify the “Top 3” Drivers
Sort your sheet by cost. In sportswear, Shell Fabric should be the #1 driver (typically 50–60% of FOB). If Hangtags or Packaging appear in the top three, you are likely over-designing the unboxing experience at the expense of product quality.
🧠 Author’s Verdict: Spreadsheet vs. PLM For startups, a well-linked Excel sheet is sufficient. However, once you exceed 50 SKUs or frequent re-costing, I recommend migrating to a PLM system like Centric Software. In our deployments, PLM automation for rolling up costs across different colorways saves roughly 10 hours of manual data entry per collection.
⚠️ Accessibility Note: Do not rely on conditional formatting (e.g., turning high-cost cells red) alone. Colorblind team members will miss this signal. Always add a text column labeled Cost Driver with values like “High” or “Low” to flag expensive items explicitly.
Step 7: Add Packaging Materials & Inventory Data

I have seen 5,000-unit shipments rejected by 3PL warehouses simply because the polybags lacked specific suffocation warning text. Packaging is not an afterthought; if a component leaves the factory with your garment, it requires a BOM row.
1. Define the Packaging Layers
Add a Packaging section to your BOM. Walk through the physical packing process and create a row for every touchpoint:
-
Polybag: Specify material (e.g., Recycled LDPE), thickness (min 0.04mm), and mandatory safety text.
-
Hangtag: Define cardstock weight (e.g., 350 GSM) and attachment method (e.g., Black Nylon String).
-
Barcodes: Input the actual UPC/EAN digits in a text column. Do not rely solely on images, which inventory scanners and screen readers cannot interpret.
-
Protection: List Silica Gel or Tissue Paper if shipping through humid zones.
2. Map Logistics & Inventory Controls
Your freight forwarder relies on this data to book shipping space. Add a Logistics category:
-
Master Carton: Specify Double-Wall Corrugated (5-ply) to prevent crushing.
-
Dimensions & Qty: List L x W x H and units per carton (e.g., 50).
-
Lead Times: Custom packaging often takes longer than garment production (25+ days). Track this specifically to prevent bottlenecks.
🧠 Author’s Verdict: DTC vs. Wholesale If selling DTC, prioritize the unboxing experience (branded mailers). If selling wholesale, prioritize compliance (standardized carton markings). I recommend creating separate BOM tabs if you serve both channels, as the packing requirements rarely overlap.
⚡ Speed Verification: The “Pack-Out” Test Physically fold a sample. Bag it, seal it, sticker it, and box it. If you performed an action not listed in your BOM rows (like applying a size sticker), you have a data gap. In our tests, this physical simulation catches 90% of missing packaging items.
Step 8: Finalize Version Control & Export
I have seen entire production runs scrapped because a factory manager opened BOM_v6 instead of BOM_v7. You must replace file-naming chaos with a rigid internal revision log.
1. Create a Revision Block
Insert a table at the very top of your BOM cover sheet. Include: Rev #, Date, Owner, Change Summary, and Approved By.
The Rule: Once the Pre-Production (PP) Sample is approved, the BOM is locked. If you change a button color, you must create a new version (e.g., Rev 1.0 → Rev 1.1) and re-issue the file.
2. Set Line Item Status
Add a Status column to every row to prevent premature purchasing. Use these three flags:
-
PENDING: Sourcing in progress. Do not order.
-
SUB PROPOSED: Factory offered an alternative; requires sign-off.
-
APPROVED: Locked for bulk purchasing.
3. Compare Real-World Examples
Use these reference tables to check your logic. Note how the Jacket BOM requires multiple layers compared to the T-shirt.
Example A: Performance T-Shirt (Single-Level) Simple consumption, minimal trims.
| Category | Item Name | Placement | Consump. | Status |
|---|---|---|---|---|
| Shell | Tech Jersey | Body | 1.15 M | APPROVED |
| Trim | Neck Tape | Inner Neck | 0.45 M | APPROVED |
| Label | Heat Transfer | Center Back | 1.00 Pc | PENDING |
| Thread | Spun Poly | Seams | 120 M | APPROVED |
| Pack | Polybag | Individual | 1.00 Pc | APPROVED |
Example B: Lined Coach Jacket (Multi-Level) Nested components requiring specific assembly order.
| Category | Item Name | Placement | Consump. | Status |
|---|---|---|---|---|
| Shell | Taslan Nylon | Outer Body | 1.60 M | APPROVED |
| Lining | Tricot Mesh | Body Lining | 1.45 M | APPROVED |
| Interlining | Fusible | Collar | 0.30 M | APPROVED |
| Trim | Snap Button | Placket | 6.00 Set | SUB PROPOSED |
| Trim | Elastic | Cuffs | 0.50 M | APPROVED |
🧠 Author’s Verdict: If your collection exceeds 50 SKUs, spreadsheets become risky. I recommend consulting ISO 9001 Document Control standards or migrating to a dedicated PLM system to automate version history.
🚀 Actionable Insight: With your BOM finalized, you must now determine the financial viability of the garment. Read our guide on [Internal: clothing sample costs] to calculate your final FOB price.
Need a factory to review your BOM? A precise BOM deserves a precise production line. Contact LeelineWear today for a line-item audit and a transparent manufacturing quote.
Troubleshooting Common BOM Failures
In my experience, a broken Bill of Materials (BOM) usually reveals itself with a panicked WhatsApp message at 3 AM: “Line stopped. Missing zippers.”
Most production disasters stem from ambiguous data, not bad manufacturing. I have analyzed hundreds of stalled orders. These are the seven most common failure points and how to fix them.
1. Production Stops for Missing Trims
The Problem: The sewing line halts because you are short 50 aglets. The Fix: You likely ignored the Minimum Order Quantity (MOQ). Always round up to supplier pack sizes (e.g., 100-unit bags) and add a Safety Stock (+5%) rule to your BOM.
2. Fabric Shortage After Cutting
The Problem: You ordered 100 meters, but the factory only obtained 92 usable meters. The Fix: Uncalculated steam shrinkage is the culprit. Ask the mill for the Shrinkage Rate (usually 3–5% for cottons) and update your Gross Consumption formula.
3. Unapproved “Phantom” Substitutions
The Problem: Your matte black zipper arrives in shiny silver. The Fix: Vague specs (“Black Zipper”) let the factory use stock inventory. Add an Approved Alternate column and require a physical signature on a “Trim Card” before bulk ordering.
4. Invoice Shock
The Problem: The final bill is 10% higher than the quote. The Fix: You likely bought in yards while the factory consumed in meters. Add a UOM Conversion column and lock the currency in the header.
5. Mismatched Color Panels
The Problem: The sleeve red does not match the body red. The Fix: Components were cut from different dye lots. Add a Lot Control Code and mandate that all panels for a single garment come from the same roll.
6. The “Wrong Version” Disaster
The Problem: The factory cuts the V2 pattern, but you emailed V3 yesterday. The Fix: Stop emailing attachments. Share a single “Source of Truth” cloud link. Enforce a Revision Log at the top of the sheet.
💡 Diagnostic: The “Dummy SKU” Trap I often add a fake line item called “Red Seal Sample” to the BOM. If the factory doesn’t ask what it is, I know they haven’t actually read the document.
⚡ Pre-Flight Checklist
Run this before hitting send to prevent the pile-up:
-
Readability: Can a non-native English speaker understand every description?
-
Access: Do all image links work without a password?
-
Math: Manually check one row to verify the wastage formula is correct.
People Also Ask About Bill of Materials (BOM)
1. What is the difference between a BOM and a Tech Pack?
A Tech Pack provides the visual blueprints and measurements, while the apparel bill of materials acts as the strict financial recipe and inventory list. They must work together. In my experience on the factory floor, purchasing managers often ignore the sketches and focus entirely on the BOM to order materials. If you do not list it in a BOM row, we do not buy it.
2. How much wastage should I add to my fabric calculation?
Use 3% to 5% for solid knits and 8% to 10% for directional prints or heavy fleece. Never use 0%. I recently audited a production run where a mere 2% variance in cutting scrap caused a shortage of 15 garments because the designer calculated “perfect” mathematical yields. Always assume the factory needs a safety buffer.
3. Should packaging be included in the BOM?
Yes. Every item that leaves the factory with the garment—including polybags, hangtags, silica gel, and barcode stickers—must have a line item. If you omit these, 3PL warehouses will often reject the shipment for non-compliance. I advise clients to treat the “master carton” as a component just like the fabric; specify the ply and dimensions explicitly.
4. Why is the factory’s quote higher than my BOM cost?
This usually stems from Unit of Measure (UOM) errors or hidden logistics fees. You might calculate in yards, but the factory buys in meters, creating a 9% cost gap immediately. Additionally, factories add a “handling uplift” for sourcing small trim quantities. When I source for LeelineWear, we list the “Surcharge” as a separate line item to keep the unit price accurate.
Conclusion: Move from Spreadsheet to Production
You now have a production-ready BOM. It contains every zipper, thread, and polybag required to build your garment, with no vague adjectives or missing costs. This document is no longer just a list; it is your contract with the factory.
Your Immediate Next Steps:
-
Sanity Check: Ensure every row has a specific consumption value and a locked status.
-
Send for Quotation: Attach this BOM to your Tech Pack and email it to your manufacturer.
-
Audit the Cost: Use your calculated totals to verify the factory’s quote. If there is a discrepancy, check your wastage percentages first.
-
Version Lock: Once you approve the [clothing sample cost page], save this file as “APPROVED_Rev1.” Do not change a single cell without logging it.
If you need a partner to review your BOM or handle the sourcing directly, contact LeelineWear today. We can take your spec sheet and turn it into a physical sample in as little as 7 days.
Related Resources:

Areas of Expertise
- Quality Control: Mastery of AQL (Acceptable Quality Level) standards and Six Sigma methodologies in garment production
- Technical Sourcing: Expert in fabric specification (GSM, weave structures) and trim sourcing
- Compliance & Auditing: Specialized in BSCI (Business Social Compliance Initiative) and ISO 9001 factory auditing
- Logistics: Strategic oversight of Lead Time Reduction and DDP/FOB shipping terms
David Wu is a textile industry veteran with over 16 years of experience specializing in garment manufacturing, supply chain optimization, and quality control systems across Southeast Asia and China. His career is defined by implementing rigorous AQL 2.5/4.0 inspection protocols for mid-to-large-scale private label brands. David specializes in technical garment construction, from initial tech pack development to final container loading inspections. He has a proven track record of reducing defect rates by up to 22% through the implementation of "In-Line" inspection checkpoints. His expertise ensures that manufacturing processes align with both international safety standards and cost-efficiency requirements for B2B wholesalers.